
[](https://github.com/rchakode/hugo-mx-gateway/actions)
Table of Contents
- [Overview](#overview)
- [Why hugo-mx-gateway](#why-hugo-mx-gateway)
- [How does it work](#how-does-it-work)
- [Prerequisites](#prerequisites)
- [Deployment](#deployment)
- [Deployment on Google App Engine](#deployment-on-google-app-engine)
- [Deployment on a Kubernetes cluster](#deployment-on-a-kubernetes-cluster)
- [Deployment on Docker](#deployment-on-docker)
- [Use the built-in form for Hugo](#use-the-built-in-form-for-hugo)
- [Configuration variables](#configuration-variables)
- [License & Copyrights](#license--copyrights)
- [Support & Contributions](#support--contributions)
# Overview
In a nutshell, `hugo-mx-gateway` provides a RESTful POST endpoint for static contact/demo request pages. It's a simple, yet a powerful tool built for this only-designated purpose.
**While this project is already deployed in production for several websites, the documentation may still contain misspellings or typos.
Contributions in any form (code/docs/ideas...) are welcomed.**
# Why hugo-mx-gateway
Did you ever experience building a static website (e.g. using [Hugo](https://gohugo.io/) or whatever alternative), then did get stuck when coming the time to add a contact/demo request form?
You're at the right place.
This project, namely `hugo-mx-gateway`, is meant to provide a RESTful API that adds the dynamicity required to handle contact/demo requests for static web sites. It's a simple, yet a powerful tool built for this only-designated purpose.
## How does it work
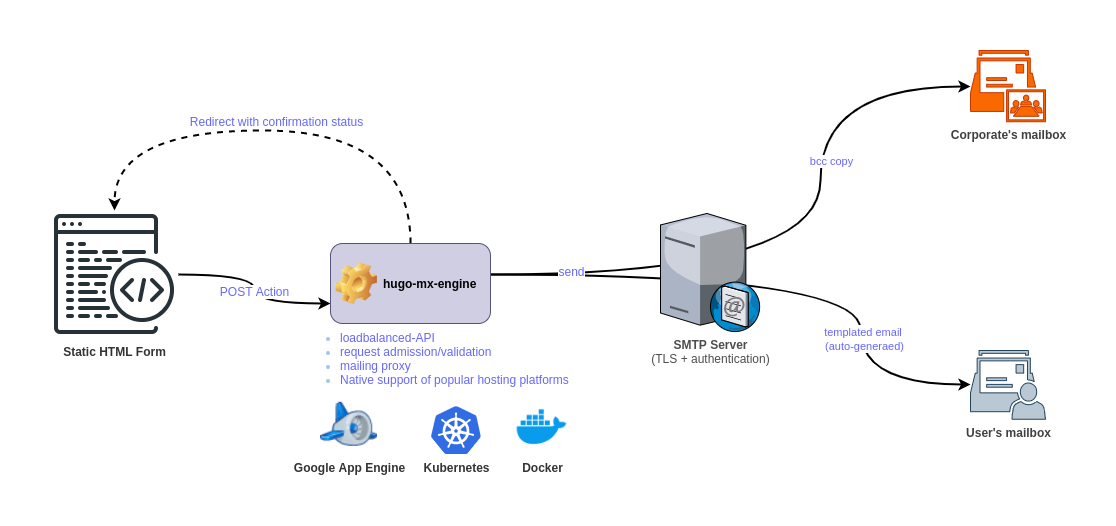
`hugo-mx-gateway` is built upon a simple request handling workflow:
* Create an HTML form with a POST action pointing towards the `hugo-mx-gateway` service. This service enables a RESTful POST endpoint backed by an application built Go. The application is released as container image along with manifests to ease deployment on [Google App Engine](https://cloud.google.com/appengine), Kubernetes, and Docker environments.
* For each user request, `hugo-mx-gateway` automatically retrieves information submitted by the user (email, subject, message details...), then **generates and sends** a **templated email** (based on [Go Template](https://golang.org/pkg/text/template/)) to the user-provided email address, while **bcc**ing a copy of that email to an address that you can define for internal tracking and follow up.
* Once a request is processed (upon success or failure), `hugo-mx-gateway` handles the reply back towards the calling static page by redirecting the browser to the origin page with additional URL parameters describing the completion status of the processing (e.g. `/contact.html?status=success&message=request%20submitted`). The parameters can then be easily retrieved and shown to the user, e.g. with a few lines of Javascript within the static page.
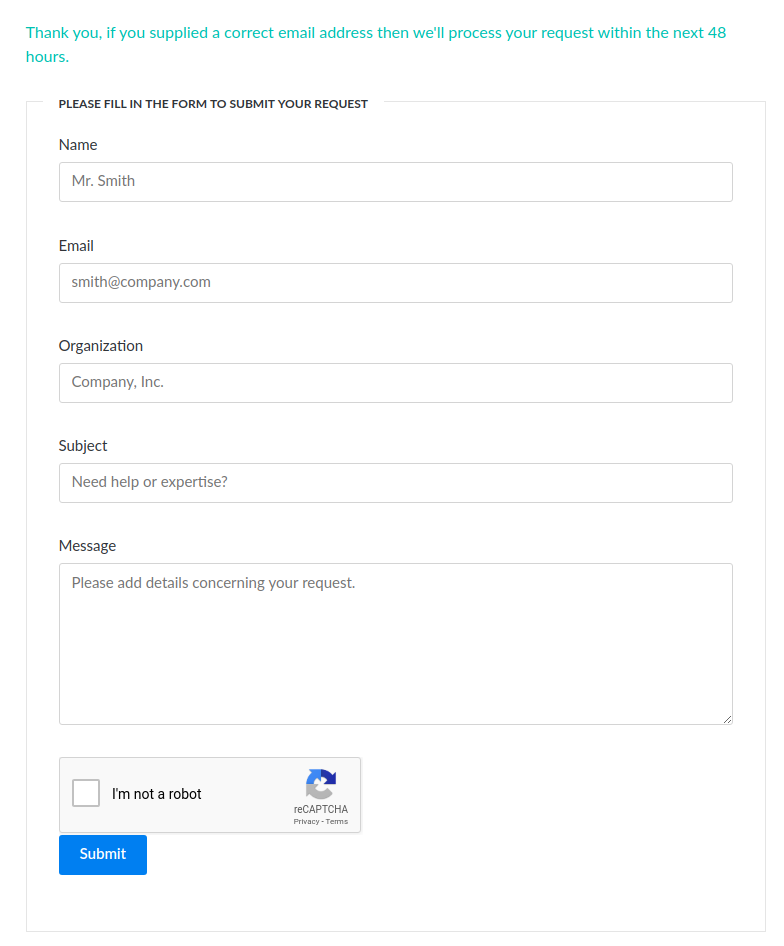
* The project is shipped with a sample HTML form intending to cover a basic use case of contact and demo requests. That said, this is a open source software, so you're free to adapt it for your specific use cases.
## Prerequisites
`hugo-mx-gateway` is easily deployable in minutes, subject to fulfil the following requirements:
* Deployment platform (at your choice): Google App Engine, Kubernetes, or Docker.
* An SMTP account with the server supporting TLS.
These are basic requirements in the today's Internet world.
> While it can be tempting to use a personal email account, it's highly recommended for security and privacy reasons not do that for an internet-hosted service. Therefore, according to your situation, you may need to ask for an SMTP account to your corporate's IT staff. If you're free to take the decision, you can opt for a cloud-based SMTP service like SendGrid, Mailgun, and Mailjet--they all offer free tier for small usage.
# Deployment
Consider one of the following resources according to the selected installation platform.
## Deployment on Google App Engine
This requires to have an active GCP account and [Google Cloud SDK](https://cloud.google.com/sdk) (gcloud) installed on your work station.
* Create/select a GCP project to deploy `hugo-mx-gateway`.
Note that each GCP project can hold only a single App Engine instance. Several applications can be co-hosted as services for the root App Engine instance. In this case, a new application has to be declared as `service` in the `app.yaml` file.
* Create the Google App Engine configuration file
```
cp app.yaml.sample app.yaml
```
* Open the `app.yaml` file with your favorite editor.
* Edit the configuration variables as described [here](#configuration-variables).
* Start the deployment
```
make deploy-gcp
```
* Check that `hugo-mx-gateway` is up and working
```
curl https://PROJECT-ID.REGION.r.appspot.com/
{"status": "ok"}
```
Replace `PROJECT-ID` with the GCP project ID, and `REGION` with the deployment region.
## Deployment on a Kubernetes cluster
There is a [Helm chart](./helm/) to ease the deployment on Kubernetes clusters.
> **Important:** The chart is validated with Helm 3 and the pod is run in an unprivileged mode within a **Security Context**.
Proceed with the deployment as follows:
* First edit the [values.yaml](./helm/values.yaml) file to set [configuration values](#configuration-variables) appropriately.
* Choose a deployment namespace. In the sample commands provided hereafter, it's assumed that the target namespace is `hugo-mx-gateway`. If you opt for another namespace, do consider to adapt the commands accordingly.
* Apply the deployment with Helm
```
helm upgrade \
--namespace hugo-mx-gateway \
--install hugo-mx-gateway \
helm/
```
* Check that the application is up and running.
```
kubectl -n hugo-mx-gateway port-forward service/hugo-mx-gateway 8080:80
curl http://127.0.0.1:8080/
{"status": "ok"}
```
## Deployment on Docker
An instance of `hugo-mx-gateway` can be quickly started on any machine running Docker.
* Please first review the [configuration variables](#configuration-variables) and adapt them appropriately.
* Then apply the following command:
```
$ docker run -d \
--publish 8080:8080 \
--name 'hugo-mx-gateway' \
-e SMTP_SERVER_ADDR="smtp.example.com:465" \
-e SMTP_VERITY_CERT=true \
-e SMTP_CLIENT_USERNAME="postmaster@example.com" \
-e SMTP_CLIENT_PASSWORD="postmasterSecretPassWord" \
-e CONTACT_REPLY_EMAIL="noreply@example.com" \
-e CONTACT_REPLY_BCC_EMAIL="contact@example.com" \
-e DEMO_URL="https://demo.example.com/" \
-e ALLOWED_ORIGINS="127.0.0.1,example.com" \
rchakode/hugo-mx-gateway
```
* Check that the container is up and functionning.
```
curl http://127.0.0.1:8080/
{"status": "ok"}
```
# Use the built-in form for Hugo
The file `./samples/hugo-partial-contact-form.html` contains a sample HTML form for Hugo. It can be used for both contact and demo requests.
Open the file in your favorite editor and review it.
Notice that the form is configured to be rendered specifically according to a Hugo parameter named **tags**, which is actually a **list of tags**. If the parameter holds a tag named `contact` then, the form will be rendered as a contact form. Otherwise, it'll be rendered as a demo form.
The integration works as follows:
* Copy the HTML form content in your target **Hugo HTML template**.
* Modify the `